 What’s The Point? – The key to bass fishing success is understanding the point
By: Richard Ziert
The Key to Success is Understanding the Point
By Richard Ziert
A long main lake and secondary points dropping sharply into the abyss, sunken islands, saddles, pinch points, knobs, ledges, and the funnels involved these are the place to catch bass. Unfortunately, these bottom features may not be well understood compared to more common bottom contours. One on one, most of these features are known to anglers. Pinch points however may need some explanation.
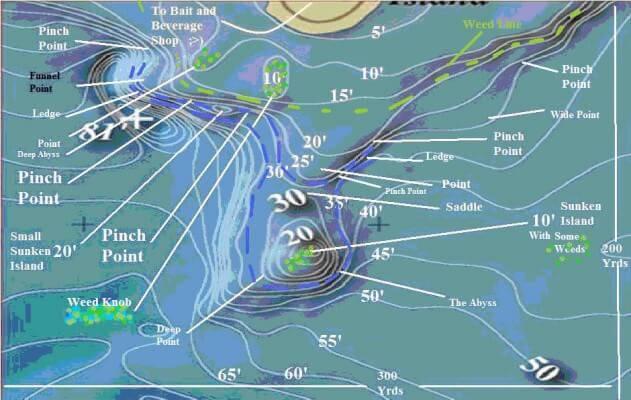
A pinch point is any bow amid tight/narrow contour lines in reasonably shallow water (15- to 35-feet or so). Inside the bow is a shelf situation that acts like a sunken island. The pinch point shelf can’t be very elongated to be effective, but has to be notably irregular to the narrow and, more or less, straight contour lines must be present.
The pinch points are the closing of the bow at each end, holding all manner of fish practically all year. The trouble is; it can be any and all kinds of fish at the same time. Bass, crappie, bluegills, walleye, etc. seem to congregate, in the same relative vicinity. Pinch points are a holding, or collection funnel, point for fish to move shallower. Once you find and fish one you’ll likely catch 25-50 fish without moving the boat; hooking a variety of species as you make broadening circles from the actual pinch point. Note; in the diagram there is a giant, slightly sloping ledge and pinch points to the right of the underwater island. This area may hold fish but it’s too big and not truly flat enough to concentrate them.
Here is something to look for that you may not have seen before.
There are a ton of, “points” in the above illustration; some are shallow and some are deeper. There are “main lake points,” “pinch points,” “funnel points,” “abyss points,” “sunken islands,” “knobs,” “ledges” and a blue light special in, and/or near the main underwater isle.
All of the mentioned points, etc., hold fish at one time or another. They do so because they act as funnel highways to shallower or productive forage water.
The prominent, eye-catching point is in the middle of the page, and its extension into a sunken island is as about as obvious as the average angler can detect … big fish problem solved? Maybe not!
Note the drift of the “blue light special” outlined. The main lake point, the predominant sunken island, the funnel point as well as the “good” set of pinch points, all seem to drift to the left of center linking with other shore features. Everything within those blue lines is a funnel to the shoreline. Coming and going with light penetration, or vegetation scenarios, some fish will undoubtedly take the most direct route to shore. The older, wiser, larger fish will swing left of center, be concentrated, or combine with other fish to follow a more indirect but safer, and more abundant path to what they need. Whichever route you choose to fish, coupled with available forage fish, you have just eliminated several acres of water toward your goal.
As respect to humps in themselves, bass will hold to the hump if the geography, flora/fauna is right. The best underwater islands are those that display a chain effect from shore bound and underwater protruding points. The more humps in the chain the better the highway between them and shore.
Still, there are humps and there are humps. The size of the underwater island, along with it’s topping out depth mixed with, water color – clear/deeper vs. stained/shallower, or weed growth and other bottom content will play a role. These components will tell you which structural features will be best for your situation. Some fish will stay put, some will cross the saddle, and some will rise in the water column. This is dependant on what’s for supper, the abundance of that supper, and the number of mouths to feed.
Those fish relating to the hump and then moving toward shore will likely stay on the underwater island or at pinch points until well past sundown as the shallower boat and people traffic of summer builds. I haven’t been down there physically, but it seems they gather in the vicinity of the pinch point constriction, waiting for something to eat to enter the bow – or the small flat ledge formed by the bow. There’s different species holding at slightly different depths and distances away from the ledge.
Where current is also present, pinch points can be looked at as a large rock or even a hole in a stream or river as well as inside turns or bends in river channels. Because pinch points act much like a current break for those other scenarios, fish hold there. Of course, some species may never enter the ledge rather eat the other fish in congregation. I’ve caught bluegills first, back off with your bait presentation and crappie show up. Back off just a little more and largemouth show up. Still further away, smallmouths enter the picture. It’s truly amazing.
It’s all about three-dimensional triangulation. Here’s another shot at the above illustration with more information. The largest triangle below is the sweetest of all sweet spots shown. There is also one triangle not illustrated – can you find it?
On the water exploration is essential, but knowing how and why things work in consort with each other is more beneficial. Triangulate – add wind /water current, water clarity, specie preferred temperature range, and direction of travel as to the big picture. With these you’ll know which direction to expect them to set up, what depth will give the best possibility, and finally a route upon which they will travel.
“Triangulation” in this case helps one understand how deep to start their search. This is a different form of triangulation; a little more complicated but ultimately faster and more rewarding.
Triangulate point #1. The “average” depth you see fish at while you are motoring from spot to spot. These fish you see on your depth finder can be suspended or on the bottom. You are looking for “average depth.” Some will be higher and some lower in the water column. Again, we want an average. Not all fish on the bottom are visible and won’t show up on any depth finder no matter the modern technology involved. You may want to keep a pre-measured paper log as you travel from spot to spot. Simply make a check mark in the box that corresponds with the level of the fish you spot on your depth finder.
Triangulation mark #2. Is the preferred temperature range of the species you are after and the bait they may be after. Example: If the smallmouth bass on your lake prefer a range of water from 55 pre-spawn to spawn to 82 degrees max at summer’s peak, simply add these numbers together and divide by two. That will give you the “at depth” average water temperature you are looking for at approximately 68 degrees.
The third point in the triangle, #3. Is the actual water clarity you find at the spot where you fish. A Secchi (light penetration) reading is really pretty simple. Drop a sinking white colored lure over the side of the boat and let it fall with a controlled free spool until it disappears from view. Stop the bait and reel in until it barely comes into view again. Pull your free line up to your eye and start a hand over hand retrieve; counting the feet of line you have out. At this point you have to triple the number of feet you discovered by the process. We do this because fish looking up can see more silhouetted against the surface light than we can by looking down. In really clear water the bait might disappear at 17 feet. 17 X 3 = 51 feet. This process tells us that practical light penetration can be as much as that 51-feet mark in open, clear water. Where there is shallower shadow producing cover (weeds, rock out cropping, surface chop, stumps, etc.) go shallower if the other triangulation factors are still in place.
So, let’s put it together:
Example #1. In traveling from spot to spot we see more fish at 20 feet than we do any other depth.
Example #2. Smallmouth preferred temp range on average is 68 degrees and we found that temperature at depth – through submersible temp gauge – at 25-feet max depth – topping out at a 15-foot depth. That average depth/temp crossover is then 20 feet.
Example #3. The water clarity we found was 51 feet max. That means fish less than the 20-foot depth we discovered earlier can still see and move on baits. Now go back to where you saw the deepest fish holding when you were motoring between spots. Let’s say that fish came in at 32-feet.
At this point in the triangulation example you have a decent idea of the range of bottom structure you need to investigate first. In other words, find structure/cover that tops out at 20 feet. Find transition areas on the bottom. Find the steepest drop near that structural feature. Investigate the range of water from 20 feet down to 32 feet in that sweet spot.
Keep in mind stained, or heavily stained water, or shadow producing cover/structure will show a shallower answer for the circumstances.
If you have a GPS unit use it for anything sticking out of the ordinary, weeds, areas where widening, narrowing, turning, making a hole, rising off the bottom, changes in bottom content and so on. Mark them all. Back up from the whole area and see how the three-dimensional picture looks. If you are Side Scan poor as I am, you can use floating marker buoys at each unusual spot. After you have them all out, 6 to 7, whatever it takes, back up and view not only the specific triangles but all of them as one at the same time to see your creation with things like the easiest rout for fish, less stressful, more stability offered.


 What’s The Point? – The key to bass fishing success is understanding the point
